Chapter Introduction: Git and Repository Management
Git is a popular version control system that is crucial for data science. As we develop code, we want to save snapshots of our work. This is beneficial for multiple reasons: 1) if we accidentally delete a file or snippet of code, we can recover it; 2) if we inject a bug into our code, we can revert to a previous version without the bug; 3) if we deploy code into production, we want to peg it to a certain version of our code. Being comfortable with Git is a critical skill for deploying data science systems. Let’s dive into the workings of Git.
The Workings of Git (at a very high level)
At a high level, Git takes a snapshot of your code, called a commit. Git stores every commit, and each one has a unique identifier. When working individually, your main workflows involve committing code to save snapshots and reverting if needed.
However, Git is also a powerful collaboration tool, which is accomplished via branching and merging. A branch is a working copy of a repository. We can create separate branches to allow multiple developers to work on the same code base at the same time. To combine the work of multiple developers, we can perform a merge.
Authenticating with GitHub
Though we can use Git locally, we often want a connect to a remote repository. Doing so gives us a vehicle to deploy our code into production environments along with a way to back up our work if our computer crashes. GitHub is a popular choice for housing code. First, sign up for a GitHub account at github.com.
Once you have your account, you’ll need to set up GitHub on your local machine, allowing you to push and pull code using the command line. To start, run the following two commands.
$ git config --global user.name "Your name here"
$ git config --global user.email "your_email@example.com"
We’ll use SSH to interact with GitHub. First, see if you have a SSH Key on your machine.
$ cd
$ ls -a
If you do not have a folder called .ssh, you’ll need to run the following command.
$ ssh-keygen -t rsa -C "your_email@example.com"
Copy your public key onto your clipboard.
$ pbcopy < ~/.ssh/id_rsa.pub
Add your public key to this location: https://github.com/settings/keys.
Finally, run the following command.
$ ssh -T git@github.com
Creating and Connecting to Your GitHub Repository
To create a repository, go to your account homepage in GitHub and click on “Repositories”. Click on “new” and follow the steps for creating a new repository. If you do not want anyone to see your code, make the repo private.
To connect to your repo, cd into PycharmProjects and clone the repo. To locate the clone URL, navigate to the repository on GitHub. Select “Clone or download” and then “Clone with SSH”. Copy the link. Then, run the following from the command line.
$ git clone “insert copied URL”
However, there might be cases where we have a directory locally, and we want to turn it into a GitHub repo. Below, we create a directory and initialize a Git repository.
$ mkdir ds_tutorials
$ cd ds_tutorials
$ git init
Create a repository in GitHub, grab the SSH clone URL, connect your repository to this remote location, and verify the operation.
$ git remote add origin “cloned URL”
$ git remote -v
Committing and Pushing Code
We now have GitHub set up! Let’s now see it in action.
First, create a file we will check into version control.
$ vim sample.py
Insert the following line into the file using our awesome VIM skills:
Now, take any files from the remote repository and pull them onto your local machine. Pulling is always best practice before pushing code, as it ensures you integrate updates from other developers.
$ git pull origin main
Track the file and add it to the staging environment. This lets Git know the file exists and also instructs Git to add it to the staging environment to be committed; "add" is a multi-purpose command. The dot tells Git to add all the files in the current working directory.
$ git add .
Take a snapshot of the code. This is the action that actually puts the code changes into version control. Any updates in between the previous commit and the current commit will be reflected. The -m adds a commit message, allowing us to more easily understand and track our changes over time. Commit messages should be short yet descriptive.
$ git commit -m “add sample.py”
Push the code onto the remote server.
$ git push origin main
If you look at your repo on GitHub, you should now see your file!
Let’s add another print statement to sample.py.
We can now see how our code has changed since our last commit.
$ git diff
We need to stage our files and commit them.
$ git add .
$ git commit -m “update sample.py”
If we run git diff again, we get nothing in return. This is because our change has already been committed. No local file differs from what we have in our commit history.
Lastly, we push our changes to our remote repository.
$ git push origin main
AWS CodeCommit
Another option for remote Git repos is AWS CodeCommit. This is an AWS service that requires an IAM account (we set those up in the previous chapter). It's pretty easy to set up CodeCommit.
- Using your AWS admin account, grant access to CodeCommit for the churn_model user. If you're foggy on this, review the relevant sections in Chapter 4.
-
Copy your public key onto your clipboard:
$ pbcopy < ~/.ssh/id_rsa.pub - Using your AWS admin account, go to IAM and select the churn_model user.
- On the user details page, select the Security Credentials tab. Choose Upload SSH public key and upload the key pasted to the clipboard.
- Copy the SSH Key ID.
-
Run the following from terminal.
$ cdInsert the following into the config file.
$ cd .ssh
$ touch config
$ vim config
Host git-codecommit.*.amazonaws.com
User INSERT SSH KEY ID FROM AWS IAM
IdentityFile ~/.ssh/id_rsa
-
Change permissions on the config file:
$ chmod 600 config -
Test connection:
$ ssh git-codecommit.us-east-2.amazonaws.com
You can now create repos in CodeCommit and use it just like GitHub.
But, which one should we use? GitHub or CodeCommit? Either will work for our project. In my opinion, GitHub has a better UI and alerting tools compared to CodeCommit. However, CodeCommit is easier to integrate with AWS workflows, though GitHub isn't that difficult to integrate with AWS (you need something called a CodeStar connection). CodeCommit also an AWS service so it fits right into our cloud security model. The ultimate choice is yours, but I will use CodeCommit.
The .gitignore File
The following sequence will commit all files in working directory.
$ git add .
$ git commit -m “commit message”
But what if we do not want to check out all files into version control? This is often desired for many types of files, such as csv files meant only for local analysis. We do not want to gum up our repository with a large number of files we do not care about tracking over time. One source of recourse is to individually add the files we want checked into version control.
Create two additional files.
$ touch sample2.py ; touch sample3.py
Only put sample2.py into the staging environment and push it to the remote repo. If we view our remote repo, we will see that sample2.py has been added and sample3.py has not.
$ git add sample2.py
$ git commit -m “add sample2.py”
$ git push origin main
For concreteness, check the files Git is tracking and notice sample3.py is not included.
$ git ls-tree -r main --name-only
However, listing all files we want to include can be cumbersome. Rather, we can create a list of file types we want to ignore. Oftentimes, we can identify these through the file extensions, though we can also directly include full file names. This set of restricted files is placed in a file called .gitignore. As the name indicates, Git ignores these files and does not track them. The dot in front of the file means it is a hidden file.
Create a .gitignore file.
$ vim .gitignore
And insert the following.
*.xlsx
sample3.py
Git will now automatically ignore csv and Excel files along with the file sample3.py. Let’s verify this operation.
$ touch sample.csv
$ git add .
$ git commit -m “add .gitignore”
$ git push origin main
git add . will now only add the files we want. How cool! We can further verify that sample.csv is not tracked by Git.
$ git ls-tree -r main --name-only
Reverting Commits
We all make mistakes. What happens if we make a bad commit? Let’s say I committed sample4.py into version control, and it is causing issues.
$ touch sample4.py
$ git add .
$ git commit -m “add sample4.py”
$ git push origin main
One of the beauties of version control is that we can revert our repository to a previous state. A reversion requires you to reference the commit hash to which you want to revert. Each commit is assigned a unique hash identifier. You can get these hashes with the following command.
$ git log
If you only wanted to view the past, say, three commits, you can modify the command to the following.
$ git log -3
I want to revert my last commit, so I will grab that hash for the reversion. To note, your hash will be different from mine. By running ls before and after the reversion, we see that sample4.py has been deleted.
$ ls
$ git revert 46063277ec8bf029ab2a3c1c6aa79a2717720570
$ ls
The reversion creates a commit we can directly push. The commit message reads: "Revert 'add sample4.py'".
$ git log -1
$ git push origin main
We can also revert a series of commits, for example, the last two commits.
$ git revert HEAD~2..HEAD
What if we want to revert a file to a previous commit? I will revert sample.py to the first commit.
$ cat sample.py
$ git checkout 073fb33efa078847f85aec57462d9932bce51033 sample.py
$ cat sample.py
We can now commit and push this change.
$ git add .
$ git commit -m “revert sample.py to initial version”
$ git push origin main
Creating Branches and Merging Code
Thus far, we have been working on the main branch, which is often not best practice. The main branch is synonymous with production, and we should only push code to the main branch that has been tested and verified. We do not want to experiment on the main branch. Rather, we should operate on a separate branch and merge our code changes into main after they have been tested.
Create and switch to new branch called develop. Right now, our branch will be an exact copy of main.
$ git checkout -b develop
View our branches.
$ git branch
Create a file on the development branch and merge it into main.
$ touch script_from_dev.py
$ git checkout main
$ git merge develop
$ ls
Our ls command reveals script_from_dev.py is now in main. We can also edit existing files and merge those into main.
Fixing Merge Conflicts
As you might imagine, merging one branch into another might not always work seamlessly. What if someone has changed a line of code on main that has also been altered on our develop branch? This is called a merge conflict. Initially, these might be a little frightening. A former co-worker of mine had a college professor who once dressed up like a merge conflict for Halloween.
We are going to create a merge conflict and resolve it. Right now, we are operating on the main branch.
$ vim sample.py
Insert the print statements on lines 2-3. Recall that since we reverted this file to its first commit, it now only has the first line.
Commit the change.
$ git add .
$ git commit -m "add print statements to sample.py"
Switch branches.
$ git checkout develop
Edit sample.py.
$ vim sample.py
Ensure the edits make the file look like the following.
Commit the changes and switch back to main.
$ git add .
$ git commit -m "update the print statements in sample.py file"
$ git checkout main
Let’s try to merge develop into main.
$ git merge develop
Whoops! Well, not really, since we meant to create a conflict. We get the following message from Git: “CONFLICT (content): Merge conflict in sample.py Automatic merge failed; fix conflicts and then commit the result.”
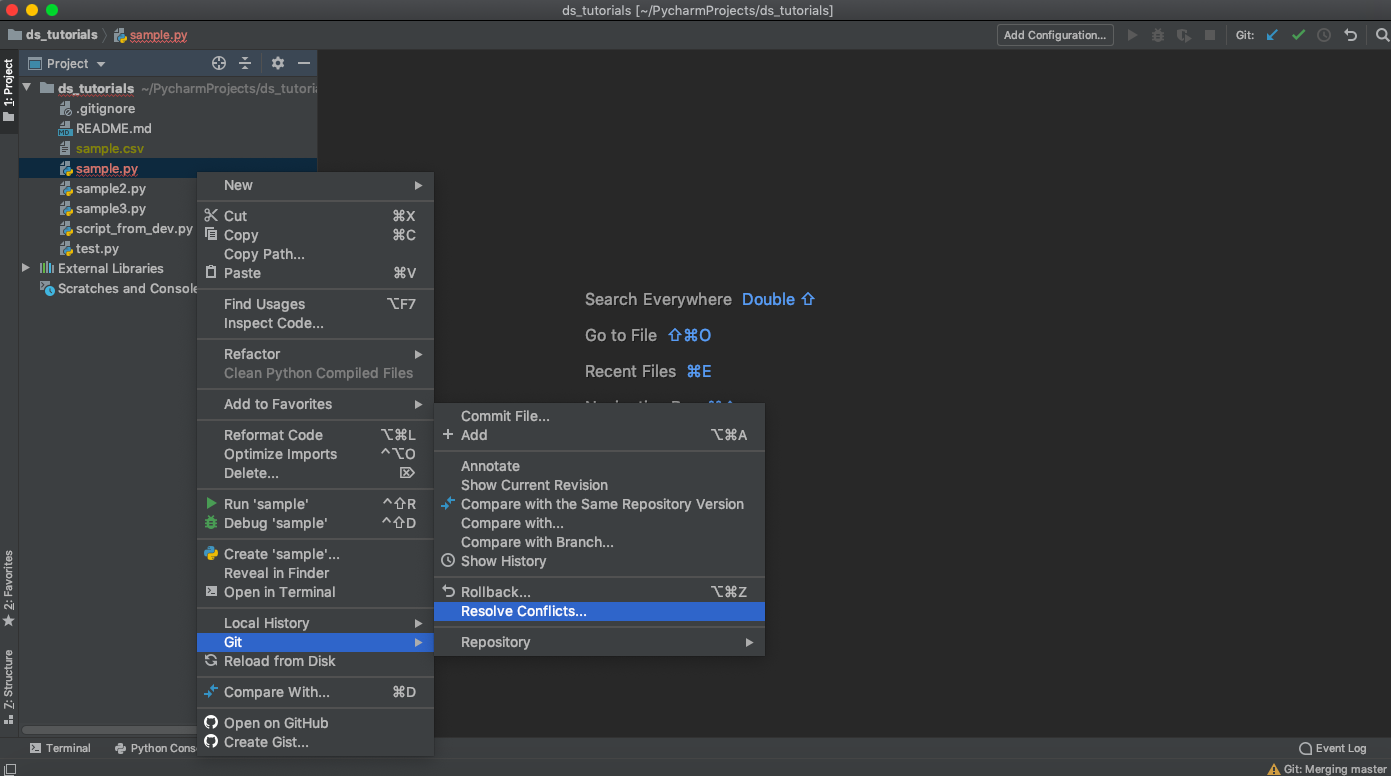
Alright, we should fix our merge conflict. Fortunately, PyCharm provides an intuitive merge tool to help us.
Right click on the file with the merge conflict and navigate to “Resolve Conflicts”.
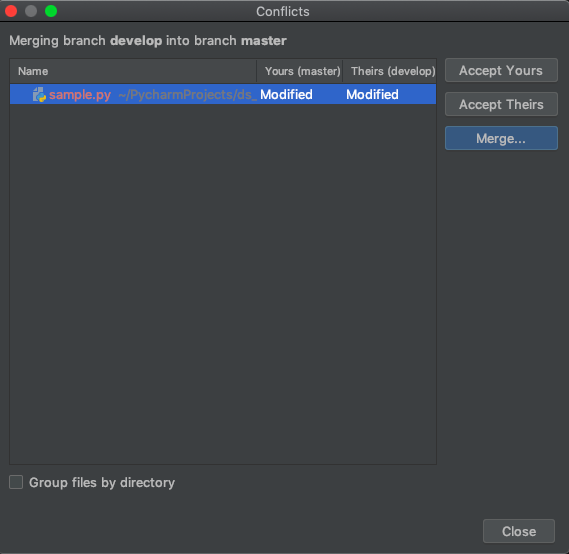
Double-click the file in the dialog box.
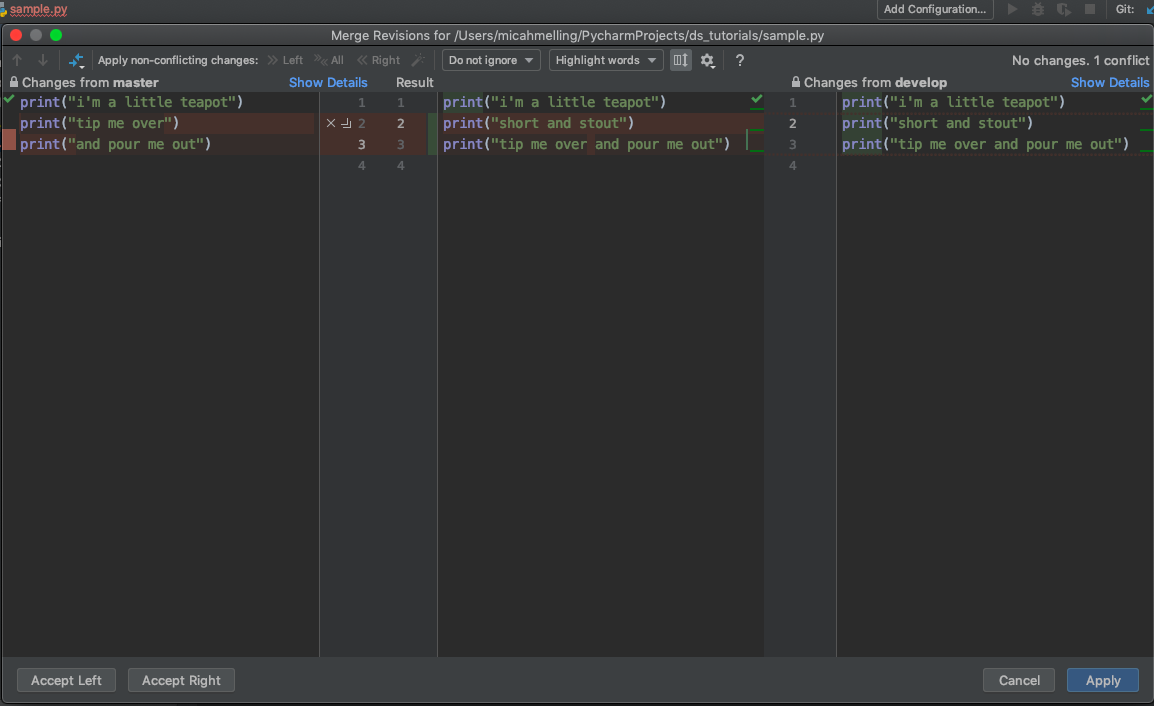
If we click “Accept Right” in the bottom right corner, we accept the changes from the develop branch and ignore the updates from main. Our sample.py file on develop is now what we have on main! Our merge conflict has been resolved! Rejoice!
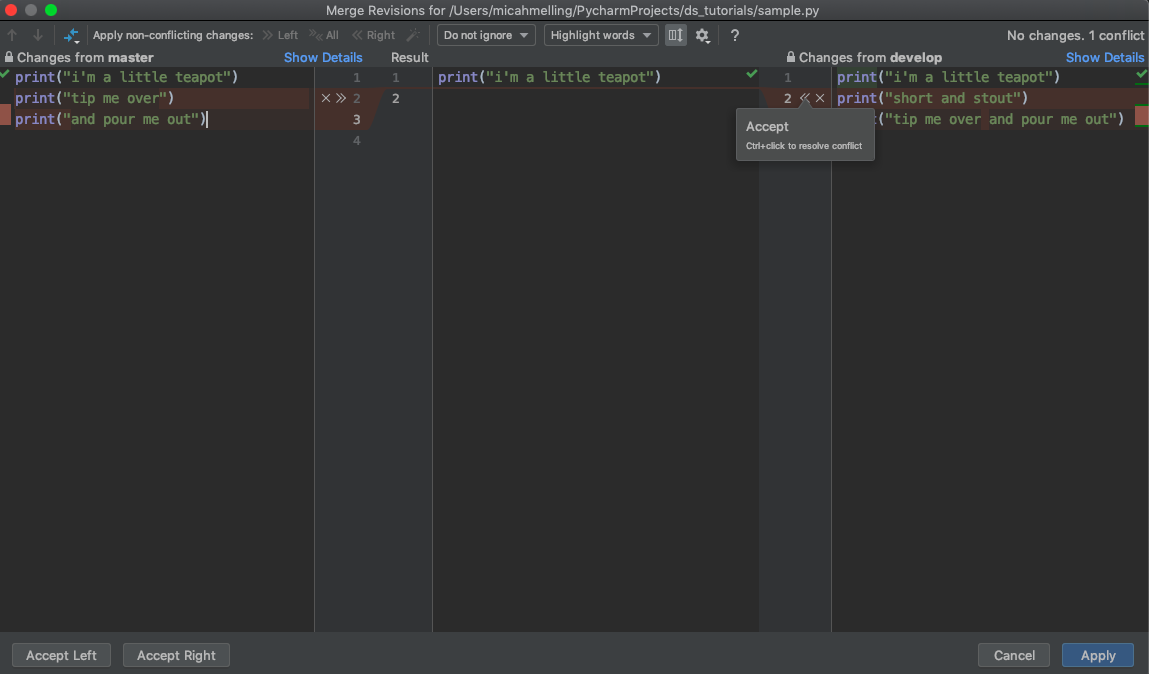
You can also move over changes by clicking on the arrows and selecting what to move over.
Git Hooks
A git hook is a script that runs when a certain git event occurs. These can help encourage certain best practices and conventions. For example, we might want to remind ourselves if we don't have a Dockerfile. Let's create such a nudge. First, we should know that git comes with hooks, but they are disabled. We will simply edit an existing hook and remove the .sample extension to create the desired functionality.
$ mkdir hooks_sample && cd "$_"
$ git init
$ touch myfile.txt
$ cd .git/hooks
$ mv pre-commit.sample pre-commit
Use a text editor to remove the existing text and enter the following text into the pre-commit file.
You'll notice that we're writing Python code. One of the neat features of git hooks is that we can author them in
different programming languages. To note, the first line of the file is a shebang and includes the path to your global
Python interpreter after the #!; the path might be different on your machine. You can find your location by typing
$ which python3
$ cd ../..
$ git add .
$ git commit -m "initial commit"
Since no Dockerfile exists, we will be given the relevant message after we make our commit. This encourages us to revert our commit, add a Dockerfile, and then re-commit. That said, it does not force us to do anything. It's a nudge only.
Finally, we can clean up.
$ cd ..
$ rm -rf hooks_sample
Pre-Commit
In the previous section, we saw the power of git hooks and how we could author them. However, a better route would be to use pre-commit, a full-fledged system for running git hooks. Using pre-commit, we can easily tap into a slew of great hooks that have been open-sourced. We can also continue to author our own, as long as they are placed in a repo that can be pip installed.
We first need to install pre-commit. Though this can be installed with pip, it does not have to be used by only
Python projects.
$ pip install pre-commit
In the root of our project, we then need to add a .pre-commit-config.yaml file. Here is one with a few useful hooks.
The IDs should make pretty clear what most, hooks are trying to accomplish. black is a common code formatter, isort sorts imports, and pyupgrade converts "old" Python syntax into "new" syntax. Many of the "standard" pre-commit hooks can be found here.
After you have your yaml file in place, you need to run the following to set up the git hook scripts.
$ pre-commit install
The hooks will run on every git commit. In the case when a hook changes your code (meaning your code did not adhere to all the standards set in .pre-commit-config.yaml), the commit will be aborted so you can review the updates. You can then re-commit and push to the remote branch.
Git LFS
Typically, storing large files in Git repositories is not recommended. Such files slow down cloning, pushing and pulling. Luckily, we can use Git Large File Store (i.e. Git LFS). As the name indicates, it provides a better mechanism for storing large files. GitHub comes with some free storage for each user. In our churn prediction project, we won't be using Git LFS, but I still want to discuss this useful tool.
We first need to install Git LFS, which can be accomplish with Homebrew.
$ brew install git-lfs
$ git lfs install
If everything installed correctly, you should see the following message on the command line: “Git LFS initialized.”.
We need to navigate to our repo and tell LFS which types of large file we want to track. Let's have it track any file with a pkl extension, which is often how we serialize large Python objects.
$ git lfs track "*.pkl"
We’ll notice that we have a new hidden file in our directory, which houses the files LFS is tracking.
$ ls -a
We can confirm LFS is tracking pkl files.
$ cat .gitattributes
Data Version Control
In addition to tracking changes in our code, we need to track changes in our models and the data used to train our models. Data science is the combination of code, models, and data. One option is to use an open-source tool called Data Version Control (DVC). This is a robust tool. However, we'll develop our own data version control. Such a task is not too hard - we can pretty easily leverage S3 and MySQL. Likewise, creating our own system gives us more control and flexibility, albeit at the cost of a bit more work. A bespoke system is also quite handy when we want to use automatic model retrains and deployments. An off-the-shelf data version control system may not play as well when run in a Docker container, which is only a temporary resource. The DVC system, along with git, is really meant to be configured and used in a local repo and connected to a remote source. Configuring version control in a Docker container is a bit awkward. We shall build our data version control system over the coming chapters.